Quality Magazine logo
search
cart
facebook twitter linkedin youtube
  • Sign In
  • Create Account
  • Sign Out
  • My Account
Quality Magazine logo
  • NEWS
  • PRODUCTS
    • SUBMIT YOUR PRODUCT
  • CHANNELS
    • AUTOMATION
    • MANAGEMENT
    • MEASUREMENT
    • NDT
    • QUALITY 101
    • SOFTWARE
    • TEST & INSPECTION
    • VISION & SENSORS
  • MARKETS
    • AEROSPACE
    • AUTOMOTIVE
    • ENERGY
    • GREEN MANUFACTURING
    • MEDICAL
  • MEDIA
    • A WORD ON QUALITY PUZZLE
    • EBOOK
    • PODCASTS
    • VIDEOS
    • WEBINARS
  • EVENTS
    • EVENT CALENDAR
    • QUALITY SHOW
    • IMTS
  • DIRECTORIES
    • BUYERS GUIDE
    • NDT SOURCEBOOK
    • VISION & SENSORS
    • TAKE A TOUR
  • INFOCENTERS
    • NEXT GENERATION SPC & QUALITY ANALYTICS
  • AWARDS
    • ROOKIE OF THE YEAR
    • PLANT OF THE YEAR
    • PROFESSIONAL OF THE YEAR
  • MORE
    • eNEWSLETTER
    • INDUSTRY LINKS
    • THE LEADERSHIP SURVEY
    • CLASSIFIEDS
    • MARKET RESEARCH
    • PRODUCT SPOTLIGHTS
    • QUALITY STORE
    • WHITE PAPERS
    • SPONSOR INSIGHTS
  • EMAG
    • eMAGAZINE
    • ARCHIVES
    • CONTACT
    • ADVERTISE
  • SIGN UP!
New Products

Force Gauge Is Suitable for Tension and Compression Testing

By John Sprovieri
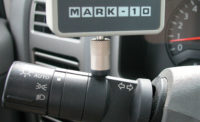
Series 2 digital force gauge from Mark-10 Corp.

The Series 2 digital force gauges are designed for basic tension and compression force testing applications up to 500 pounds. 

Photo courtesy Mark-10 Corp.

Series 2 digital force gauge from Mark-10 Corp.

The gauges are compatible with a variety of test stands and grips.

Photo courtesy Mark-10 Corp.

Series 2 digital force gauge from Mark-10 Corp.
November 7, 2024

Tension and compression testing are used to measure how a material reacts to push and pull forces. It’s a common way to determine a material’s mechanical properties, which are important for designing components and assessing their performance.

In the test, a sample is placed between a load cell and a fixed base plate, and a beam moves the sample. The load cell records the force on the sample, and an extensometer measures the strain.

Tension tests are used to calculate the load a material can withstand before tearing or breaking, and the extent of its degradation up to that point. It can be used to measure the strength of a metal or plastic or to assess bonded, welded or riveted joints.

Compression testing measures how a material responds to crushing loads. It involves applying pressure to a material specimen until it reaches a point of instability. The test results in a stress-strain diagram that shows the material’s properties, including elastic limit, proportionality limit, yield point, and compressive strength. Compression testing is important for determining if a material is suitable for a specific application or if it will fail under certain stresses.

The Series 2 digital force gauges from Mark-10 Corp. are designed for basic tension and compression force testing applications up to 500 pounds. Peak tension and compression readings are reliably captured via the gauges’ ±0.5 percent accuracy and 500 hertz sampling rate. Results can be displayed in one of three units of measurement.

A backlit graphic LCD displays the current, peak tension, or peak compression reading. A USB output is provided for data collection.

These compact gauges are overload protected to 200 percent of capacity. An ergonomic, reversible aluminum housing allows for handheld use or fixture mounting. It is rugged enough for applications in both production and laboratory environments. The gauges are compatible with a variety of test stands and grips.

For more information on test systems, click mark-10.com or visit the company’s booth at The ASSEMBLY Show South, which will be held April 16-17, 2025, at the Music City Center in Nashville, TN.

Besides test and inspection equipment, you’ll find some 150 suppliers of automation, fastening tools, robotics, parts feeders, presses and other assembly technologies. The show is being held in conjunction with The Quality Show South and Adhesives in Action. For more information, visit www.assemblyshowsouth.com.
This article was originally posted on www.assemblymag.com.
KEYWORDS: compression testing force measurement tensile testing

Share This Story

Looking for a reprint of this article?
From high-res PDFs to custom plaques, order your copy today!

John Sprovieri is Editor in Chief of Assembly Magazine .

Recommended Content

JOIN TODAY
to unlock your recommendations.

Already have an account? Sign In

  • 2024 Quality Rookie of the Year Justin Wise 1440x750px banner with "Quality Rookie of the Year" logo inset

    Meet the 2024 Quality Rookie of the Year: Justin Wise

    Justin Wise is an exceptional individual who has been...
    Aerospace
    By: Michelle Bangert
  • Man with umbrella and coat stands outside while it rains at night looking at a building.

    Nondestructive Testing: Is there an ethics problem?

    I was a whistleblower who exposed fraudulent activities...
    NDT
    By: Dale Norwood
  • Unraveling Deflategate: Football stadium with closeup of football on field

    Unraveling the Tom Brady Deflategate

    The Deflategate scandal erupted following the 2014 AFC...
    Measurement
    By: Greg Cenker and Henry Zumbrun
Subscribe For Free!
  • eMagazine Subscriptions
  • eNewsletters
  • Online Registration
  • Subscription Customer Service
  • Manage My Preferences

More Videos

Sponsored Content

Sponsored Content is a special paid section where industry companies provide high quality, objective, non-commercial content around topics of interest to the Quality audience. All Sponsored Content is supplied by the advertising company and any opinions expressed in this article are those of the author and not necessarily reflect the views of Quality or its parent company, BNP Media. Interested in participating in our Sponsored Content section? Contact your local rep!

close
  • image: Meeting in a conference room, all three people looking at an ipad.
    Sponsored byInnovMetric

    Your Manufacturing Process Deserves Digitally Connected 3D Measurement Data

Popular Stories

Technician working with the Vision Engineering LVC200.

Difference Between Calibration and Verification

Woman working in quality control, measuring a workpiece.

AI’s Double-Edged Sword: Security and Compliance in Manufacturing

QM0525-FEAT-A3-Automation-p1FT-Quality-Inspection.jpg

The Next Frontier of Automation: Quality Assurance in an AI-Driven Era

April 29 Quality Advantive Live Webinar

Events

April 29, 2025

When AI Meets SPC: Unlocking Even More Value From Your SPC Quality Data

Discover how SPC's real-time data collection, monitoring and control capabilities provide the perfect foundation for AI/ML's predictive insights, enabling both immediate process optimization and long-term continuous improvement.

May 21, 2025

The Evolution of Laser Radar: Measuring Large Scale From Distance With High Accuracy

This webinar, featuring a live demonstration, will showcase the evolution of Hexagon’s direct scanning laser trackers: cutting-edge technology that now delivers traditional reflector-tracking accuracy to non-contact, large-part scanning.

View All Submit An Event

Products

Lean Manufacturing and Service Fundamentals, Applications, and Case Studies

Lean Manufacturing and Service Fundamentals, Applications, and Case Studies

See More Products
Play Quality's captivating word-guessing game! There's a new word every Friday.

Related Articles

  • force measurement

    Recommended Compression and Tension Adapters for Force Calibration

    See More
  • QM 0323 Test Inspection MMS 5000 L3 feature

    Determining if Force and/or Material Testing is Right for your Application

    See More
  • compression testing

    Nondestructive Compression Force Testing: What, Why, and How

    See More

Related Products

See More Products
  • M:\General Shared\__AEC Store Katie Z\AEC Store\Images\Quality\FDA-and-worldwide-quality.gif

    The FDA and Worldwide Quality System Requirements Guidebook for Medical Devices, Second Edition

  • design for six sigma roadmap.jpg

    What Is BPM?

  • mech non destructive.jpg

    Mechanical and Non-Destructive Testing DVD

See More Products

Related Directories

  • C2 Gauge & Fixture

    C2 GAUGE & FIXTURE specializing in the American Modular Tooling (AMT) fixturing system, traditional checking fixtures, CMM holding fixtures, and more – including design, build, engineering services supporting all CAD environments. Utilizing AMT enables manufacturers to configure, and reconfigure ultra-rigid fixtures quickly, saving time and money. Visit: c2gauge.com
×

Stay in the know with Quality’s comprehensive coverage of
the manufacturing and metrology industries.

eNewsletter | Website | eMagazine

JOIN TODAY!
  • RESOURCES
    • Advertise
    • Contact Us
    • Directories
    • Store
    • Want More
  • SIGN UP TODAY
    • Create Account
    • eMagazine
    • eNewsletter
    • Customer Service
    • Manage Preferences
  • SERVICES
    • Marketing Services
    • Market Research
    • Reprints
    • List Rental
    • Survey/Respondent Access
  • STAY CONNECTED
    • LinkedIn
    • Facebook
    • YouTube
    • X (Twitter)
  • PRIVACY
    • PRIVACY POLICY
    • TERMS & CONDITIONS
    • DO NOT SELL MY PERSONAL INFORMATION
    • PRIVACY REQUEST
    • ACCESSIBILITY

Copyright ©2025. All Rights Reserved BNP Media.

Design, CMS, Hosting & Web Development :: ePublishing