Test & Inspection: Measuring Magnetic Properties
Measuring magnetic properties can determine the effect of heat treatment on a material

Image Source: lechatnoir/E+ via Getty Images
Magnetic measurements are suitable to determine mechanical and technical properties of a material especially steel. The magnetic and mechanical properties of a material are determined by the microstructure. The microstructure is determined by the chemical composition of a material. In the case of steel, heat treatment also has a significant influence. A targeted heat treatment adjusts technical properties such as hardness, tensile strength or elasticity. In contrast, an untargeted heat treatment produces phenomena such as grinding burn, grain coarsening or residual stresses. Measuring magnetic properties can determine the effect of heat treatment on a material.
The material is magnetized in an alternating magnetic field. An interaction of the magnetically effective components of the material with the external field takes place. According to Faraday’s law, short electrical pulses are generated by induction. The pulses are measured with a coil. The type of microstructure determines the frequency and intensity of the electrical pulses. The method and the physical effect is called Barkhausen noise (BNA). The method has been used and scientifically studied for over 100 years.
All previous providers of this technology follow the approach of digitizing the analog measurement signal and evaluating the maximum amplitude. In the industrial environment, the evaluation of the maximum amplitude is susceptible to interference and not sensitive enough to mechanical and technical changes. Through the procedures of modern data analysis, new methods are used to interpret the measurement signals.
Mathematical methods such as the Short-time Fourier Transform (SFFT) can be used to gain further insight. The SFFT decomposes a signal into spectra with the properties frequency, time and amplitude. The computational effort and the amount of data are very large. Therefore, the calculation of the SFFT is usually done on special hardware. In addition to the electrical signal from magnetic measurement, parasitic electrical currents are also involved in industrial processes. Parasitic electric currents cause a spurious signal and can lead to a misinterpretation of the data evaluation. Digital filters are applied and reduce the parasitic signals. This achieves good measurement stability in the industrial environment.

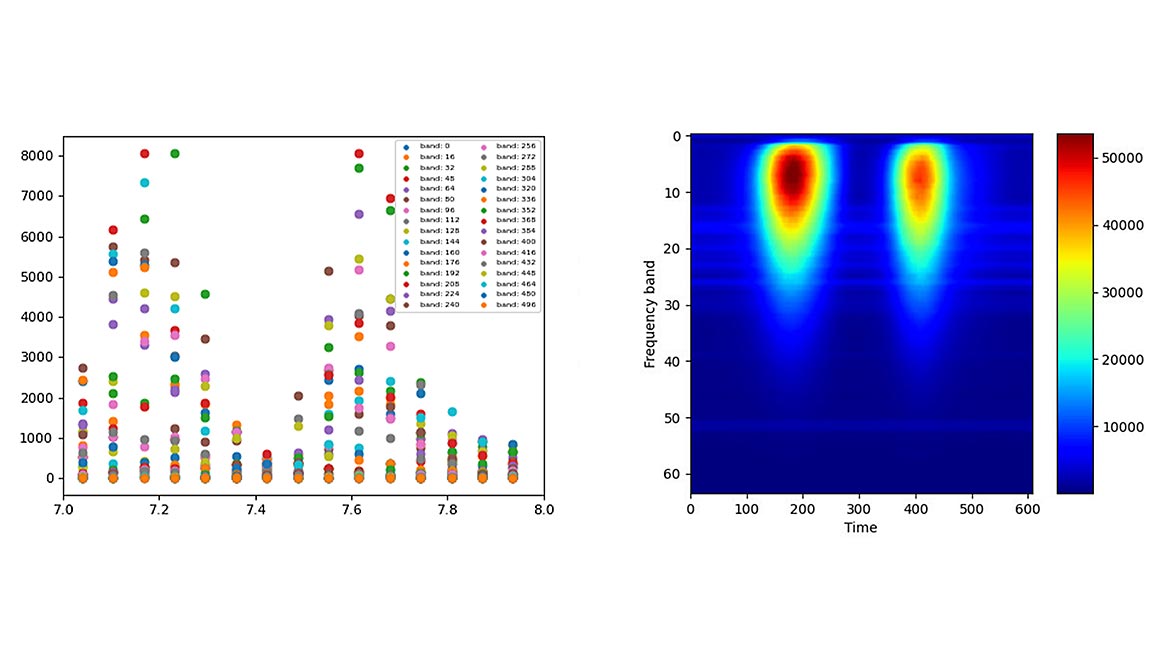
Graphical representation of the algorithm function for data reduction with compression of significant data in the frequency resolution range. Images Source: QASS
In the context of magnetic measurement, the main advantage is the statistical significance of the measurement result. Test frequencies (F) of the magnetic field are from 100 Hz up to 4,000 Hz. There are 2*F measurements of a material per second. The measurement can be stationary or under motion and quickly generates an effective number of measurements. The statistically determined deviation at a measuring point is less than 2 percent.
With high sampling of the measurement signal and use of the SFFT, a large amount of data is generated with many measurement repetitions. In an industrial context and in series production, intelligent data management is necessary. A further necessity is the avoidance of disturbing external influences on the measurement signal and the improvement of the evaluability of the useful signal while reducing the noise component.
One possibility for this is the application of algorithms and processes of digital image processing. Extensive modules, models and solutions for machine learning and data science under Python are available for digital image processing. The representation of SFFT data of a magnetic measurement correspond to image-like data and therefore can rely on extensive methods.
In our case, in the FFT representation, the area of a signal pair correlates with the twofold magnetization of a material. Physically, the magnetic hysteresis is traversed. The area of the hysteresis represents the performed magnetic work. Mechanical and technical properties of a material are determined from the image data.
The repeated remagnetization results in numerous measurement repetitions for a material location. These measurement repetitions can be superimposed. In this case, all measurement repetitions of hysteresis runs are combined into a single pair of Barkhausen hills. This allows statistical measurement deviations to be minimized. In addition, outliers and interfering influences can be detected and eliminated.
The method can also be used for moving measurements. In this case, the superposition is calculated for short time intervals. For each time interval a representation of the hysteresis run is generated. The size and overlap of the time segments can be parameterized to match the speed of movement.
The overlapping leads to a general improvement and interpretability of the measurement signal. Material of high hardness generates small magnetic responses and low measurement signals. Irregular signals from edge areas of the mound pairs are taken into account more than in a single measurement, if they have a reference to the technical properties and measurement conspicuity. The measurement remains stable under the same process conditions and is robust against measurement errors. At the same time, process changes are detected quickly and reliably. High magnetic excitation frequencies create alias effects on the data. The method reduces alias effects to a minimum. High excitation frequencies are important in grinding burn detection.
The superposition of hysteresis passes allows a significant increase in temporal resolution. At the same time, many measurement repetitions can be combined. This allows high data compression with very little loss of information. Measurements can be displayed in a standardized way due to the superposition. This enables direct comparability of measurement results. The standardized representation forms the basis for further analyses. Both analytical approaches and machine learning approaches require comparable data representations.
The application of machine learning to magnetically generated measurement data is a novelty in data analysis and determination of technical properties in an industrial context. The applications are further enhanced by the available integrability of machine learning methods. Linking with process metadata such as alloy composition, heat treatment parameters will take place in the future and allows the control of entire process lines with knowledge of only one or two parameters.
Looking for a reprint of this article?
From high-res PDFs to custom plaques, order your copy today!


