Quality Magazine logo
search
cart
facebook twitter linkedin youtube
  • Sign In
  • Create Account
  • Sign Out
  • My Account
Quality Magazine logo
  • NEWS
  • PRODUCTS
    • SUBMIT YOUR PRODUCT
  • CHANNELS
    • AUTOMATION
    • MANAGEMENT
    • MEASUREMENT
    • NDT
    • QUALITY 101
    • SOFTWARE
    • TEST & INSPECTION
    • VISION & SENSORS
  • MARKETS
    • AEROSPACE
    • AUTOMOTIVE
    • ENERGY
    • GREEN MANUFACTURING
    • MEDICAL
  • MEDIA
    • A WORD ON QUALITY PUZZLE
    • EBOOK
    • PODCASTS
    • VIDEOS
    • WEBINARS
  • EVENTS
    • EVENT CALENDAR
    • QUALITY SHOW
    • IMTS
  • DIRECTORIES
    • BUYERS GUIDE
    • NDT SOURCEBOOK
    • VISION & SENSORS
    • TAKE A TOUR
  • INFOCENTERS
    • NEXT GENERATION SPC & QUALITY ANALYTICS
  • AWARDS
    • ROOKIE OF THE YEAR
    • PLANT OF THE YEAR
    • PROFESSIONAL OF THE YEAR
  • MORE
    • eNEWSLETTER
    • INDUSTRY LINKS
    • THE LEADERSHIP SURVEY
    • CLASSIFIEDS
    • MARKET RESEARCH
    • PRODUCT SPOTLIGHTS
    • QUALITY STORE
    • WHITE PAPERS
    • SPONSOR INSIGHTS
  • EMAG
    • eMAGAZINE
    • ARCHIVES
    • CONTACT
    • ADVERTISE
  • SIGN UP!
MeasurementTest & Inspection

Better Machine Vision: The Benefits of Combining 2D and 3D

By Terry Arden
Better Machine Vision: The Benefits of Combining 2D and 3D
May 25, 2017

Part 1

In the world of automated industrial quality control and inline inspection, both 2D and 3D technology have important roles to play. In this three part blog series we will look at the strengths and limitations of each, and how combining the two creates a more complete inspection system.

Starting with 2D Technology

2D is the more established of the two technologies, and over the past 30 years has proven highly effective in a wide range of automation and product quality control processes.

Contrast Driven Feature Processing

2D technology delivers results based on features relating to contrast in a grayscale or color image. 2D is suited to applications for absence/presence detection, discrete object analysis, pattern alignment, barcode and optical character recognition (OCR), and a variety of 2D geometric analysis based on edge detection for fitting lines, arcs, circles and their relationships (distances, angles, intersections, etc).

Pattern Matching: A Key To Handling Part Variation

2D technology is largely driven by contour-based pattern matching to identify part location, scale and orientation. Technicians can use 2D to identify a part and create inspection tools that dynamically adapt to the part’s position, angle, and size for robust measurement due to part movement. Today’s pattern matching handles occlusions, clutter, distortion, contrast reversal, overlapping parts, and uneven lighting.
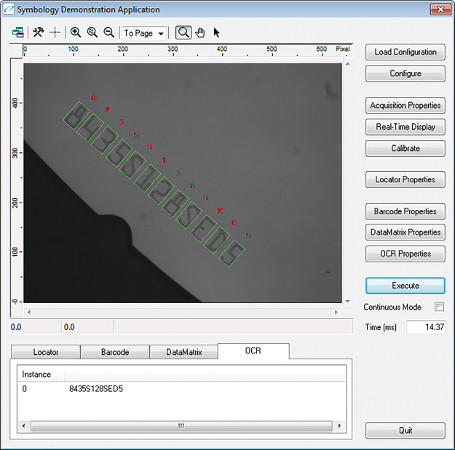
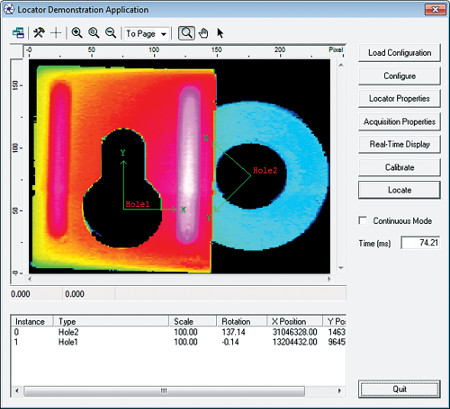
2D and 3D pattern matching

2D MACHINE VISION IS USED FOR:

  • Barcode and character reading
  • Label inspection and verification
  • Basic positional verification
  • Feature presence and 2D dimensional verification
  • Surface marking detection

Limitations of 2D Technology

Can’t Measure Shape

2D sensors don’t support measurement related to shape. For example, 2D sensors aren’t able to measure features such as object flatness, surface angles, part volumes, or differentiate between objects of the same color, or differentiate between object positions with touching sides.

Vulnerable to Variable Lighting Conditions

Because lighting determines edge locations and measurement accuracy, lighting variations across the sensor’s field-of-view can sometimes cause edge measurement errors unless specific techniques are used to compensate for this effect. In factory conditions, lighting variation is a common challenge from unexpected ambient or spot sources on the manufacturing floor.

Limited Contrast Compensation

2D sensors rely on measuring an object’s contrast (edge data), which, for example, means they are unable to measure a black object on a black background or distinguish part features without specific lighting to expose the presence and definition of an edge.

Sensitive to Object Movement

Because of errors caused by component movement, 2D sensors require precise fixturing along the optical axis (Z axis), the use of scale-invariant feature detection, or large telecentric optics (must match size of FOV) to remove the effect.

Stay tuned for Part 2 on 3D technology

KEYWORDS: 2D technology 3D technology pattern matching variation

Share This Story

Terry Arden is the CEO of LMI Technologies. For more information, visit www.lmi3d.com.

Blog Topics

Shifting the Paradigm

Jim's Gems

Steve Adams: Operational Strategies

Recent Comments

Therefore great deal to take place over kinds...

Gee… I translate writes on a similar to...

As it turned out, it is quite possible...

For some it is significant, and so research...

nike tiffany and co jacket

Subscribe For Free!
  • eMagazine Subscriptions
  • eNewsletters
  • Online Registration
  • Subscription Customer Service
  • Manage My Preferences

More Videos

Sponsored Content

Sponsored Content is a special paid section where industry companies provide high quality, objective, non-commercial content around topics of interest to the Quality audience. All Sponsored Content is supplied by the advertising company and any opinions expressed in this article are those of the author and not necessarily reflect the views of Quality or its parent company, BNP Media. Interested in participating in our Sponsored Content section? Contact your local rep!

close
  • image: Meeting in a conference room, all three people looking at an ipad.
    Sponsored byInnovMetric

    Your Manufacturing Process Deserves Digitally Connected 3D Measurement Data

Popular Stories

Technician working with the Vision Engineering LVC200.

Difference Between Calibration and Verification

Woman working in quality control, measuring a workpiece.

AI’s Double-Edged Sword: Security and Compliance in Manufacturing

QM0525-FEAT-A3-Automation-p1FT-Quality-Inspection.jpg

The Next Frontier of Automation: Quality Assurance in an AI-Driven Era

April 29 Quality Advantive Live Webinar

Events

April 29, 2025

When AI Meets SPC: Unlocking Even More Value From Your SPC Quality Data

Discover how SPC's real-time data collection, monitoring and control capabilities provide the perfect foundation for AI/ML's predictive insights, enabling both immediate process optimization and long-term continuous improvement.

May 21, 2025

The Evolution of Laser Radar: Measuring Large Scale From Distance With High Accuracy

This webinar, featuring a live demonstration, will showcase the evolution of Hexagon’s direct scanning laser trackers: cutting-edge technology that now delivers traditional reflector-tracking accuracy to non-contact, large-part scanning.

View All Submit An Event

Products

Lean Manufacturing and Service Fundamentals, Applications, and Case Studies

Lean Manufacturing and Service Fundamentals, Applications, and Case Studies

See More Products
Play Quality's captivating word-guessing game! There's a new word every Friday.
×

Stay in the know with Quality’s comprehensive coverage of
the manufacturing and metrology industries.

eNewsletter | Website | eMagazine

JOIN TODAY!
  • RESOURCES
    • Advertise
    • Contact Us
    • Directories
    • Store
    • Want More
  • SIGN UP TODAY
    • Create Account
    • eMagazine
    • eNewsletter
    • Customer Service
    • Manage Preferences
  • SERVICES
    • Marketing Services
    • Market Research
    • Reprints
    • List Rental
    • Survey/Respondent Access
  • STAY CONNECTED
    • LinkedIn
    • Facebook
    • YouTube
    • X (Twitter)
  • PRIVACY
    • PRIVACY POLICY
    • TERMS & CONDITIONS
    • DO NOT SELL MY PERSONAL INFORMATION
    • PRIVACY REQUEST
    • ACCESSIBILITY

Copyright ©2025. All Rights Reserved BNP Media.

Design, CMS, Hosting & Web Development :: ePublishing