NDT - Hardness Testing
Portable Hardness Testing Methods
Consider these devices for use in the field.

Shear Pin Brinell Testers. Source: Ernst Hardness Testers

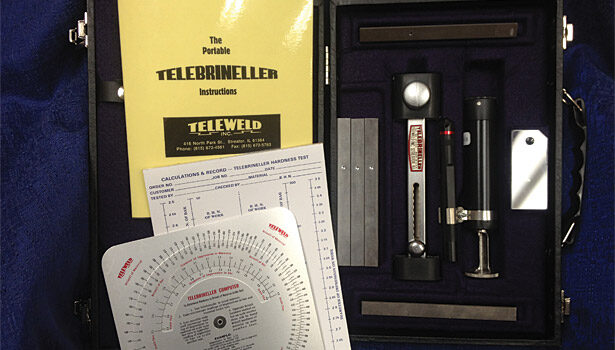
Tellebrinell Testers. Source: Teleweld Inc.

King Portable Brinell Testers. Source: King Tester Corp.

Ultrasonic Contact Impedance (UCI) Testers, Source: Phase II

Leeb (or rebound) Testers
One of the most common requests we receive at our office is from confused customers in need of a portable hardness tester for use in the field. In Houston, where we are based, that usually means a chemical plant, refinery or a pipeline related application. Unlike NDT equipment, where a specific method tends to stand out based on the location of suspected anomalies, portable hardness testing lacks that well defined, clear path due to the number of variables affecting the results obtained.
The purpose of this article is to shed some light on the various styles of portable testers and the pros and cons of each. This is a 10,000 foot view of the various methods we encounter in this region. It is not meant to select a superior test method or to analyze the effectiveness of a given tester. There is a reason that all of these test methods are used; they are all effective for their specific application(s).
These portable devices were developed because of the impractical aspects of bringing a stationary Brinell, Rockwell or Vickers tester to the field. If you can’t cut samples and take them to the lab for analysis then your only option is to test with a portable device. Unfortunately, portable testers do not directly replace their stationary counterparts; i.e. they do not meet ASTM E10, ASTM E18 or ASTM E384 standards. Most are addressed in separate ASTM standards specific to the test method. This is not a statement declaring that these devices are inaccurate when compared to stationary devices. It is just worthy to note that there are certain limitations due to the inherent nature of field measurements and this must be taken into consideration when judging the results obtained.
The most common portable devices used in the energy and petrochemical markets we serve are the King Portable Brinell Testers, Tellebrinell Testers, Shear Pin Brinell Testers, Leeb (or rebound) Testers and Ultrasonic Contact Impedance (UCI) Testers. Each of these devices has pros and cons that will be addressed individually. Images of each style tester are shown throughout for reference.
Test Variables
There are five major variables that directly affect the accuracy and repeatability of any hardness reading obtained in the field. They are, in no particular order, the operator, surface condition, material form/geometry, material thickness and metallurgy. There are certainly other factors which can affect the hardness values obtained but we will stick to these five due to the limited scope of this article. Each of the variables listed above must be considered when selecting the appropriate tester and method but in most cases there will be one or two that either eliminate or favor a given tester.
Brinell Testers
We will start with the broadest group of portable test devices used in our region, Brinell testers. Each of the three common portable Brinell testers has one thing in common; they all rely upon the operator’s ability to optically read an impression that is made in the material under examination. Each Brinell tester applies the mechanical load in a somewhat different manner and will be addressed below.
In general, any test requiring a manual optical reading obviously creates a degree of subjectivity due to the human variable. It needs to be noted that this can be overcome with the use of an electronic reader and measurement software but this adds considerable cost to the technique. The other possible error that can arise from the human variable is the application of the load and it is most evident on the two hammer based systems. A misplaced strike can result in an oval shape to the impression and this in turn creates inaccurate measurements. As the operator gains experience with these devices this type of error decreases rapidly.
The King Portable Brinell tester is the only device that actually applies a calibrated load of 3,000 kilograms on a 10 millimeter ball using a hydraulic test head. This allows the test results to be directly compared to a stationary Brinell test. This test method is covered under ASTM E110. The tester must clamp the material under examination and can handle vertical dimensions up to 20 inches. It is a larger device and requires some strength on the part of the operator but the human variable is less evident during the application of the load due to the clamping hydraulic test head.
The applications where the Shear Pin and Tellebrinell testers have a distinct advantage over the King Portable Brinell tester are those where the component under test only has one accessible test surface available, a very common occurrence in our region. The Shear Pin and Tellebrinell testers utilize a three-pound hammer to supply the load required for the impression. Since these test methods do not require clamping, large stationary specimens such as pipelines, pressure vessels and storage tanks can be tested. However, it must be noted that these examinations are not covered under the ASTM E110 standard. Telebrinell tests are covered by ASTM A833 and are classified as a comparative method. The Shear Pin test method is not covered under an ASTM standard at this time. There are consumable expenses associated with either of these techniques. The Tellebrinell test requires test bars and the Shear Pin test requires calibrated shear pins.
A general benefit of either type of Brinell test is the permanent impression left in the material. This allows another person to verify the reading obtained at a later date. This benefit may be viewed as a negative on finished parts and for that reason another test method such as UCI might be warranted in those cases.
Leeb (Rebound) Testers
Developed in the mid 1970s, the Leeb method became the first widely accepted portable electronic tester for measuring the hardness of very large components located in the field in a matter of seconds. The “rebound” name comes from the basic nature of the test. An impact body inside of the device probe is released at a specific velocity onto the test specimen. The resulting rebound velocity is compared to the original velocity and a Leeb hardness (HL) is obtained and displayed digitally on the device. This value can then be converted by the software to display conventional HRC, HV or HB scales along with others.
At the time, this tester was considered to be revolutionary. Unfortunately, many of these devices were purchased for use in applications where the method is limited and this created confusion regarding the accuracy of the device. When used in the appropriate application these devices are quite accurate, very simple to use and the repeatability is high.
The most critical variables affecting the test are part thickness and mass. As described above, there is an impact body that is released at a given velocity onto the surface of the object under test. If the material thickness is too thin, with little mass, then the material actually flexes at impact. This creates an error in the rebound velocity and in turn affects the reading obtained. The values will be very inconsistent in this situation. If you look at the calibration block for any brand of Leeb tester you will notice that it is quite large; now you know why.
Large castings, steel rolls, large forgings and other heavy wall components can be examined very reliably with this device. This type of test is addressed in ASTM A956.
Ultrasonic Contact Impedance (UCI) Testers
The last type of tester is probably the least understood of the common portable devices. The UCI method utilizes a probe containing a rod with a Vickers diamond mounted on one end. The rod is oscillated at a frequency of approximately 70 KHz and when the diamond is pressed into the test material (motorized or manually), the frequency is shifted from this base value due to the properties of the material being examined. The instrument software compares the two frequencies and mathematically converts this to a Vickers (HV) value. This value can then be converted to other scales in the same manner as the Leeb tester described above. This device has several probe designs based on load (1 kgf to 10 kgf) and tip configuration. UCI tests are addressed in ASTM A1038.
UCI testers are not general purpose devices; they have very specific applications where they are effective and accurate. Originally developed to measure tool steel with high HRC values, they were slowly introduced into other markets. In our region the main use is in the measurement of hardness in the heat affected zone of welds in thinner materials. Because of the small footprint of the Vickers diamond, it is quite effective at measuring up to the toe of a weld. Other portable testers have a larger footprint and this limits their ability to measure in this area. It is also an excellent tool for looking at the hardness of gear teeth due to the small impression. Case hardened materials can also be analyzed since the lighter load does not penetrate into the softer substrate.
With UCI testers, the material under test must be fine-grained and homogeneous due to the small area being examined. The surface condition must also be polished. Therefore, raw castings and forgings are generally ruled out since the surface hardness varies from one location to the next. The other consideration is metallurgy. These are comparative testers and for that reason you must calibrate on a metallurgically identical sample with the same relative hardness in order to obtain accurate readings. The operator can also greatly affect the outcome if the proper technique is not used to obtain the reading.
You might ask, “Why use this device if there are so many caveats?” The answer is that there are some jobs in the field that can only be performed with this device. In the right hands, this tester provides accurate information where no other can.
The decision regarding which tester and method to use must be determined by analyzing the application in its entirety. Evaluate each of the major variables present in the examination and determine which tester and method is least affected. In addition, requirements for electronic documentation and the permanence of any impressions marring the test surface are also factors that must be considered.
It should be evident from the above discussion that there is not one general purpose, portable hardness tester capable of handling every test. That is, after all, why each of these methods will continue to be utilized for years to come.
Looking for a reprint of this article?
From high-res PDFs to custom plaques, order your copy today!


